SSH-tunnel-based instance with fixed Crazyflie
Summary
In this tutorial, you are shown how to instantiate a workspace that is accessed
through an SSH tunnel. As an example, the workspace type demonstrated here is
fixed_crazyflie, but the basic steps can be applied to any type for which SSH
tunneling is an option.
If you want to see an example video that you can reproduce, skip to the section Reviewing results.
If you think that something is missing, or if you find errors, please contact us or open a ticket.
Searching
To begin, sign-in to https://rerobots.net, and go to to the search
page. As an example in this tutorial, we will use
a workspace deployment that has the type fixed_crazyflie. Note, however, the
basic steps can be applied anywhere that an SSH-tunnel-based connection is
desired. If one is not already listed, enter "fixed_crazyflie" into the search
field, or try the following URL:
https://rerobots.net/search?q=fixed_crazyflie&maxl=u
There should be at least one match, as in the following screenshot:
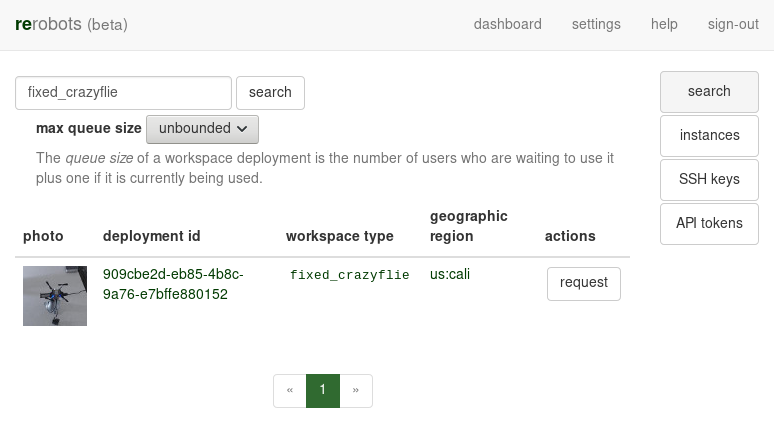
Click on the photo or the "deployment id" of one of the items in the search results. You will get a brief description of the workspace.
Requesting an instance
To request to use the workspace deployment that you are viewing, click the "request instance" button. The next page provides some choices about the instance that you will create. It should look like:
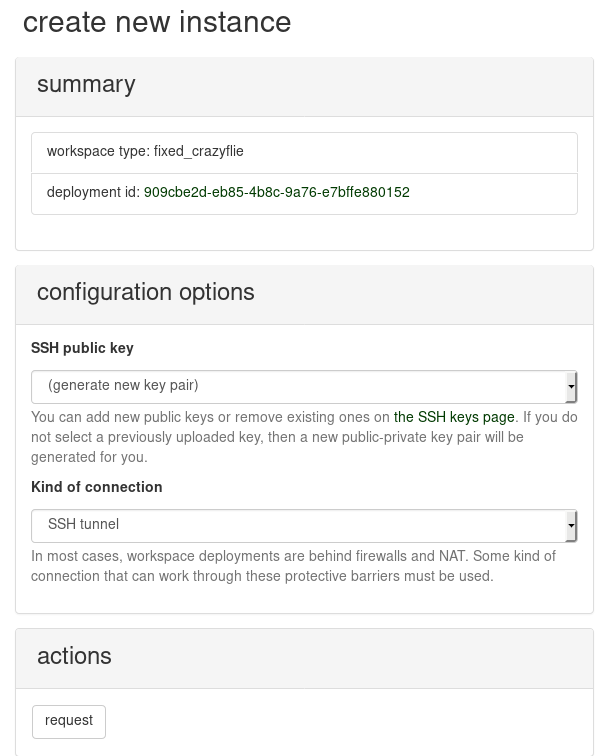
Under "kind of connection", select "SSH tunnel". For the SSH public key that provides authorization for remote log-in to the instance, you can select one that you previously uploaded, or you can have a new key pair generated for you as part of instantiation. When you are ready, request the instance. A reservation system is under development, so your request might be denied if someone else started to use the same workspace. If you encounter difficulty here, please contact us.
If your request is accepted, then you will be redirected to a page that shows all of your active instances. If you selected to generate a new SSH key pair, then notice that there is now a message at the top of the page:
Your new workspace instance is initializing! Because you did not use an SSH key that is already associated with your user account, a new key pair was generated for this instance. The following link can be used to download the private key precisely once.
In this case, when you are ready, select the link "Download private key." to
download a file named key.pem. Be careful to only click the link when you are
ready for the download. If you selected to use one of the SSH keys already
associated with your account, then there is no
link to "download private key" because it is assumed that you already have the
corresponding private key.
In the table of your instances, you will find the one that you just created. Its
status should be INIT, which indicates that it is initializing.
Your first log-in
After several seconds or minutes, the instance will be READY as in the following example screenshot:
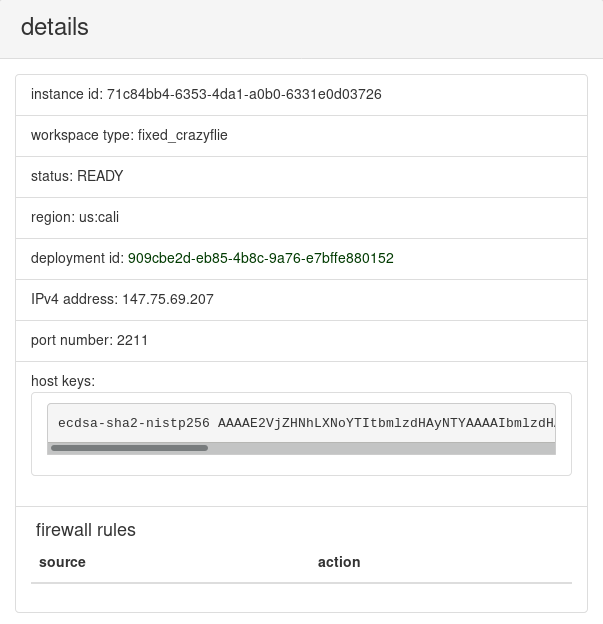
In the details panel, an IP address and port number are listed. On this address and port there is an SSH server listening for incoming connections to the main host of your instance. Also, notice the subsection titled "firewall rules". It contains a table of rules that determine which hosts can send packets to the SSH server that is listening for your instance. Note that even if packets are allowed to reach the SSH server, it is necessary to have the correct private key to log-in, independently of the firewall rules.
The default behavior is to drop all incoming packets, so it is at least necessary to add one rule to allow you to log-in. There are several methods to determine the externally visible address from which you are accessing the Internet. For example, at the terminal, try
curl https://ipinfo.io/
New rules can be added in the panel titled "modify firewall rules", as shown in the screenshot:

Addresses are specified in CIDR notation (RFC
4632). The default (if no netmask is
declared) is /32, that is, only from the given address. While for a long-lived
instance accepting traffic from anywhere is usually not desirable, you can use
0.0.0.0/0 to do so.
There should now be a row in the table of firewall rules: 0.0.0.0/0 ACCEPT.
To log-in, open a terminal. Assuming that your private key is in the local directory in the file key.pem, then,
ssh -i key.pem -p 2211 root@147.75.69.207
If you selected an SSH key that is uploaded to your rerobots account, then the
switch -i key.pem can be omitted or changed as needed.
The hostkey presented by the SSH server can be compared with the one listed in
the details panel (example is shown in screenshot earlier in this tutorial).
Installing required packages
To visualize the space, we will start a ROS node that streams images from the webcam. The instance already has the "desktop" installation of ROS Kinetic, but for this tutorial, the package cv_camera must also be installed. To do so,
apt-get update
apt-get install -y ros-kinetic-cv-camera
To send thrust commands to the Crazyflie
quadrotor in this tutorial, cfheadless
must be installed. It is part of the Crazyflie client
software.
The current release can be installed from
apt-get update
apt-get install -y python3 python3-pip python3-pyqt5
pip3 install -U pip
pip install cfclient
Finally, create a minimal configuration by creating the file /root/.config/cfclient/config.json with the contents
{
  "enable_zmq_input": true
}
This can be achieved in one command,
mkdir -p /root/.config/cfclient && echo '{"enable_zmq_input": true}' > /root/.config/cfclient/config.json
Finally, start cfheadless to connect to a Crazyflie that is attached to the
host via USB:
cfheadless -u usb://0
Running an open-loop controller and recording a video
Now that cfheadless is using the terminal for output, open a new terminal and
log-in again to the instance host via SSH. Create a file named demo.py with the
following contents:
import time
import zmq

sender = zmq.Context().socket(zmq.PUSH)
sender.connect('tcp://127.0.0.1:1212')

sender.send_json({
'version': 1,
'ctrl': {
    'roll': 0.0,
    'pitch': 0.0,
    'yaw': 0.0,
    'thrust': 0.0
}
})

time.sleep(1)

sender.send_json({
'version': 1,
'ctrl': {
    'roll': 0.0,
    'pitch': 0.0,
    'yaw': 0.0,
    'thrust': 35.0
}
})

time.sleep(2)

sender.send_json({
'version': 1,
'ctrl': {
    'roll': 0.0,
    'pitch': 0.0,
    'yaw': 0.0,
    'thrust': 0.0
}
})
This Python program commands zero thrust, small positive thrust, and after 2 seconds, zero thrust again.
To create a demo log file, we will run the ROS node cv_camera_node, rosbag
record, and demo.py (the file defined above), each of which requires its own
terminal. To do so, start as many new SSH log-ins as needed, or use a terminal
multiplexing tool like screen or tmux, and run each of
roscore
rosrun cv_camera cv_camera_node
rosbag record -a
python3 demo.py
After demo.py finishes, kill the rosbag record process and compress the log
file:
rosbag compress *bag
Then, download the compressed log file to your local storage. There are several
tools available to copy files via an SSH connection, such as scp. For example,
you might use a command like the following:
scp -i ~/.ssh/unodist -P 2210 root@147.75.69.207:/root/2018-02-27-00-05-15.bag .
Notice that to specify the port number used by scp, the switch is uppercase
-P.
Reviewing results
Assuming that you have ROS installed locally, the
rosbag file can be played back at a slower speed
and visually reviewed in rqt. After starting
roscore, run a rosbag play process by a command like
rosbag play -r 0.25 2018-02-27-00-05-15.bag
Open the rqt GUI, select the drop-down menu "Plugins", then "Visualization",
and "Image View". The Image View plugin can display images from the
/cv_camera/image_raw ROS topic, which contains data from the webcam in the
workspace of this tutorial.
Conclusion
When you are done, return to https://rerobots.net/instances, find the instance
that you created in the table, and push the terminate button.